
Friday, July 14, 2017
Rock Paper Scissors Using LSTM
Recently I have been doing a lot of research into using LSTM for data compression (in cmix, lstm-compress, and tensorflow-compress). In 2011 I made a website about Rock Paper Scissors AI. I realized that LSTM should be good at playing RPS, so today I made a small demo to do that: http://www.byronknoll.com/lstm.html
Saturday, May 20, 2017
Solar Panels
My wife and I recently bought a house in the San Francisco Bay Area. We are getting solar panels installed on the roof of the house. In this area it is a great financial investment - there is a lot of sun and the electricity rates are high. There is also a 30% federal tax credit for solar installations.
Determining the best size of the system to install depends on your electricity usage. Producing more power than you consume is less profitable.
We got quotes from three different companies. The quotes are surprisingly different:
SolarCity:
System size: 2.7 kW
Estimated annual production: 4,036 kWh
Cost before rebate: $11,394
Cost after rebate: $6,381
Price per watt: $2.36/W
Sunrun:
System size: 2.61 kW
Estimated annual production: 3,526 kWh
Cost before rebate: $10,559
Cost after rebate: $7,391
Price per watt: $2.83/W
SunWork:
System size: 2.61 kW
Estimated annual production: 5,050 kWh
Cost before rebate: $7,050
Cost after rebate: $4,950
Price per watt: $1.9/W
SunWork has by far the best price at $1.9/W. Not only that, but their system is estimated to produce far more kWh than the two other companies. Their system uses microinverters instead of a central inverter. Microinverters have a longer warranty: 25 years instead of 10 years. They are also more efficient than a central inverter. With a central inverter the system only produces as much as the least efficient panel. Microinverters allow each panel to independently perform the DC-AC conversion and also allow you to monitor the performance of each panel.
Another reason SunWork estimates a larger annual production is because they did a better job of optimizing the layout of the panels on our roof. Each company had a different layout:
SolarCity:

Sunrun:

SunWork:

SunWork managed to squeeze all nine panels onto southern facing parts of the roof. Sunrun had cool software which created a 3D model of our roof and automatically detected vents and surrounding trees (useful for modelling shadows). For all three companies the panel placement seemed to be done manually - combined with some software to estimate annual output.
Update: SunWork panels have been installed! Here is a dashboard to monitor our system output.
Update#2: The final price was lower than their initial quote: $6,565
Thursday, February 11, 2016
Trackball Mouse

A couple years ago I bought this neat mouse on Amazon. It is surprisingly useful. I can use it to remote control my computer from my bed. It is also useful for controlling my Avegant Glyph when not sitting at a desk.
Wednesday, February 10, 2016
Avegant Glyph Review

Two years ago I made a post about a device called Avegant Glyph. I ended up investing in the Kickstarter. The estimated delivery during the Kickstarter campaign was December 2014. I finally got the Glyph two days ago.
It is a very cool device, but fell short of my expectations. Initially I spent a lot of time trying to get the position of the display calibrated for my eyes. It was very difficult to calibrate - I couldn't get a clear view of the entire rectangular display. The nose pieces that came with the device keep the display too far from my eyes. I found that removing the nose piece helps me get closer to the display, getting a clearer picture. However, I still can't get a completely clear view of the corners of the display even with my eyelashes touching the lens. The device is also a bit uncomfortable without a nose piece.
Ignoring the calibration issues, the quality of the display is amazing. Colors are very pure and reading text is easy. The display quality looks much better than the Oculus Rift developer versions. However, the resolution of the display is not very high.
Originally I was hoping this could be used as a complete replacement for my desktop monitor. The calibration issues really prevent this from working well. It is annoying to not be able to see text in the corner of the display clearly with both eyes. I tried watching a movie with the device while lying down. This worked well. The weight of the device was supported by the bed, so it was not uncomfortable. The corner calibration issues were hardly noticeable while watching the movie (probably because focusing on the edges wasn't necessary).
Saturday, January 09, 2016
Raspberry Pi Thermostat Instructions
Here are some details on how I put together my Raspberry Pi thermostat.

My apartment's thermostat uses a very simple mechanism to control the heater:

Connecting the red wire to the white wire turns on the heater. Near the center of the thermostat is a glass vial containing some mercury. If the vial tilts to the right the mercury creates a connection between the wires. I attached the two black wires on the bottom and use the Raspberry Pi to control the connection between the wires. The original thermostat remains fully functional: the heater will turn on if either the Raspberry Pi or the original thermostat signal it to turn on.

Materials used: The relay module controls the connection between the two heater wires. GPIO output from the Raspberry Pi can turn the connection on/off. The connection is off by default - even when the Raspberry Pi is powered off. I SSH into the Raspberry Pi to control the GPIO pin over the Internet.
Friday, January 08, 2016
Raspberry Pi Thermostat

I connected a Raspberry Pi up to the heater in my apartment. Now I can control the heater over the Internet.
Update: more details posted here.
Tuesday, January 05, 2016
An Update on Baka

[previous post]
Although Baka Analytics has stopped updating, Baka is still alive. The occasional gaps in the data were due to Baka chewing through the wire which connects the magnetic sensor to the Raspberry Pi (which I had to fix several times). The outage since September 12 is a more serious issue: all of the USB ports on the Raspberry Pi stopped working. I think Baka caused this by urinating on the Raspberry Pi (which was stored next to his cage). I have ordered a replacement Raspberry Pi to use on another project, so it is unlikely I will restart Baka Analytics.
Baka's record was running 17.31 kilometers in a single night. In total Baka was recorded running 682.29 kilometers.
Monday, January 04, 2016
Metaball Go
 Today I worked on a small HTML5 project: http://www.byronknoll.com/go.html
This is the board game Go rendered using metaballs.
Friday, November 13, 2015
Battle Map Explorer
Unfortunately the Kickstarter project I created did not get funded. Here is what the funding graph looked like: Today I released an open source project based on the idea used in the Kickstarter project: https://github.com/byronknoll/battle-map-explorer
 Today I released an open source project based on the idea used in the Kickstarter project: https://github.com/byronknoll/battle-map-explorer
Wednesday, November 11, 2015
cmix v8
I have released a new version of cmix. I have also migrated the code from a private Bitbucket repository to a public GitHub repository: https://github.com/byronknoll/cmix.
Thursday, August 13, 2015
Kickstarter Project
 I just launched my first Kickstarter project! https://www.kickstarter.com/projects/411355421/battle-map-explorer
Saturday, April 25, 2015
Baka Analytics

I have a pet hamster named Baka. Baka spends most of his free time running on a hamster wheel. I put together a device to track the hamster wheel's rotation. It uses a Raspberry Pi 2, a magnetic sensor, and Google Analytics. Here is a webpage with live coverage of Baka's running: https://sites.google.com/site/bakaanalytics/. He tends to run about 6 kilometers per day (13,000 rotations) and sticks to a strict schedule of running between 10pm and 6am.
Sunday, March 01, 2015
Picavet
I have been attempting to do aerial photography with a GoPro. My first attempt was using a quadcopter (Parrot AR.Drone):

Unfortunately the GoPro was too heavy for the quadcopter and it kept crashing. I tried two types of mounts for the camera: one on top (pictured above) and one suspended underneath the quadcopter using string. Mounting on top was more stable, but the quadcopter still occasionally crashed so it was too risky to attempt flying high altitudes.
One of my coworkers told me about a way to mount a camera to a kite using a device called a Picavet. I constructed my own Picavet using two wooden rulers and some carabiners:

It works great!

Wednesday, February 04, 2015
Thursday, December 04, 2014
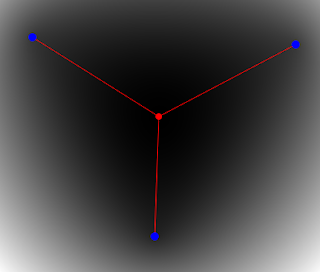
Geometric Median
During a meeting with some coworkers we started debating if it was possible to find a better meeting location. Given the starting location of all the meeting participants, could we find a point which minimizes the total travel distance?
It turns out that it is not trivial to solve. The average of the participant locations is not necessarily the optimal point. The actual optimal point is called the geometric median.
I made a HTML5 page which visualizes the geometric median, along with the convex cost function: http://www.byronknoll.com/median.html

Thursday, August 21, 2014
Cardboard
 I finally own a VR device: Google Cardboard. It works surprisingly well! I am using it with a Nexus 5, which has a nice display. Cardboard doesn't work quite as well as the first developer edition of the Oculus Rift (see my review here), but it is pretty close. The demo apps for Cardboard are currently quite limited, so there isn't really much to do on it after the first 10 minutes. I am still waiting for my kickstarter edition of the Avegant Glyph: they have delayed the delivery date until next year :(
Saturday, July 26, 2014
Wargames
I recently started a fun activity called wargaming. Wargames are a set of computer science related challenges/puzzles. So far I have completed three of the wargames on overthewire.org: Bandit, Krypton, and Leviathan. I track my progress on wechall.net. wechall.net tracks scores across dozens of wargaming sites and has user rankings/leaderboards. The wargames I have seen touch many different areas of computer science: cryptography, network security, linux tools, C++ debugging, etc. Very educational.
Wednesday, July 16, 2014
Dwarf Fortress

I recently beat GTA V, so I was looking for a new game to play. GTA V is the most expensive video game ever made and has amazing production value. I eventually decided on Slaves to Armok: God of Blood Chapter II: Dwarf Fortress as the next game I would try. It is on the opposite-end of the game spectrum compared to GTA V: it is free, made by a single developer, and has a text-based interface. I am a fan of NetHack and it looked like DF might have some similarities.
I have been playing DF for three days and so far it is incredible. The first day was tough since there is such a steep learning curve. My first fortress was a mess because I didn't understand how stairs/slopes worked - all my dwarves got trapped underground in a pit. I ended up watching a youtube tutorial to figure out the basics. After the tutorial I started up a second fortress and for the last two days I have managed to survive in this.
I had one near disaster when my fortress ran out of food. My dwarves were so hungry that they started ignoring my orders so I couldn't get them to work on actually finding new food sources. Some of my dwarves started dying and one went crazy and started attacking everyone. I thought I was doomed until suddenly a group of immigrants arrived. I immediately put the healthy immigrants to work on making/collecting food. Success!
Today I worked on creating a reliable water source for my fortress. I looked up how wells work on the DF wiki and starting building one. It ended up taking me two hours to finish the well. My fortress is underground and the most convenient water source was from a river on the surface. Channeling water around is dangerous because it could end up flooding my fortress or drowning the workers mining the tunnels. I built a tunnel from the river to a reservoir below my fortress. The well is connected to the reservoir. To control the flow of water I created two floodgates and connected them to levers in my fortress. I could then use the levers to control the flow of water from a safe distance, once the dwarves had finished digging and evacuating the reservoir. In the screenshot above you can see one level of my fortress and a party my dwarves organized in celebration of the new well.
Sunday, July 06, 2014
visibility_polygon.js Version 1.5

I have released a new version of my visibility polygon library. One of the constraints in the old version was that none of the input line segments could intersect. In this new version, I added a function which breaks apart any intersecting line segments into non-intersecting components.
Demo: http://www.byronknoll.com/visibility.html
Thursday, June 26, 2014
cmix v3
I have released cmix version 3. This version is over twice as fast, uses less memory, and gets better compression ratio.
Subscribe to:
Posts (Atom)